 I'm so excited to have Rita from Suburbs Mama here today! When I first stumbled upon Rita's blog I was shocked by the amazing dress refashions and skirts she makes. I'm still such a newbie to sewing clothes and was immediately drawn to how detailed her tutorials are and how she makes refashioning look so easy and actually doable. Here are a few of her creations that I'm loving, to see more head on over to her blog.


Hi! I am Rita from suburbsmama. I was thrilled when Christina asked me to do a guest post on Fat Quarter Friday. I absolutely love her blog and everything she makes.
Today I am going to show you how to make a elastic waist, color blocked children's skirt.
(my daughter is a 4T):
OK, lets get started!
Take your 2 pre-shrunk fat quarters (you need two coordinating prints):

Measure your little girl and determine how long you wanted the skirt to be. Then add 2 1/2 inches to that, then cut off the access (there is a longer side to a fat quarter, that will be the waist, the shorter side is the length):

Then you need to divide your fabric squares into 3 even sections each. (6 1/2 inches wide):

Cut them all, now you should have 6 pieces:

Next you need to pin them all together (alternating the print):

Here is the wrong side all pinned:

Here is how the right side looks all pinned:

Sew all the sections together:

Then when you have sewn all of the pinned sections, put the last to ends together and sew:

Next, you need iron open all of the seams:

Ok, now we need to make a elastic casing, fold and iron down a half inch:

Then fold and iron an inch :

Sew the casing, leaving about 2 inches open:

Insert your elastic:

Once you have pulled your elastic all the way through, over lap the two ends about an inch and sew and back stitch a few times:

Then stretch the elastic and sew the casing closed:

Next, we need to create a hem, fold and iron a half inch:

Then another half inch:

Sew the hem:

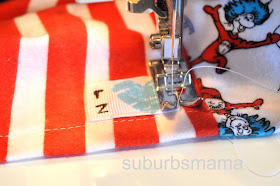
At this time I attached my label (optional):

All Done:


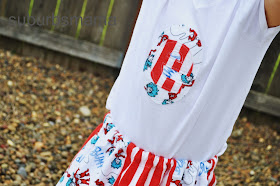
I made a matching shirt with some of the scraps:

Come and visit me at Suburbsmama
Thanks for joining us today Rita! This is the most perfect little outfit for this weekend. Happy Fourth of July!

Great tutorial, I think I may even be able to make this one, seeing as I have only made one article of clothing in the last 15 years!
ReplyDeleteThat's so adorable! I love the fun prints!
ReplyDeleteI love Rita, she always has cute things and this one does not disappoint. I love the fabric:>
ReplyDelete