 A few weeks ago our store bought clothespin bag finally gave out and I have been storing our clothespins in a plastic Walmart bag...cringe! Even the hubby made a comment last weekend on how he was shocked that I haven't made a clothespin bag yet. So this week, I made a clothespin bag. I wanted a bag that was not made with a clothes hanger and one that would have ties to attach to my laundry basket as well as my clothesline. I also knew I wanted it to have a drawstring on the top to keep the clothespins from falling out. I really love how this little bag came out and I think it fits my laundry needs perfectly. This bag is very quick to make and will definitely make hanging the clothes out on the line much easier...or at least prettier.
 Clothespin Bag Tutorial(takes about 1-2 hours to complete)
 Materials Needed:
* 2 fat quarters in contrasting fabrics
 Cut your two fat quarters into the following sizes:
Main fabric:
1 piece at 20" x 14" (bag)
1 piece at 21" x 3" (part of the drawstring)
Contrasting fabric:
3 pieces at 20" x 3" (large ties and button flap)
1 piece at 7" x 3 1/2" with rounded edges (bottom of bag)
2 pieces at 20" x 2" (ties for the drawstring)

Start by making the large ties for the bag. Take 2 of the 3 pieces that are 20" x 3". Fold right sides together and sew along one side. Make the ends pointy if you want. Leave one side open for turning right side out. You do not have to do anything to the open end since it will be sewn into the bag later. You should now have two ties.
Now take the other piece that is 20" x 3" and fold the two ends together with right sides facing. The piece should now be 10" long by 3" wide.
Sew along all 3 sides and once done, turn right side out. Iron flat and then top stitch around 3 sides. This is going to be the buttoned flap.
Gather the main fabric piece that is 20" x 14" and pin right sides together. Piece of fabric should be 10" x 14" when pinned together. Sew just the open side.
Now take the 7" x 3" piece of fabric and round the edges slightly. Pin in place onto the bottom of the bag piece. Sew. Searge or zig-zag unfinished edge.
Turn right side out. Take the 21" x 3" piece of fabric and fold both edges in twice to hide raw edges. Top stitch ends.
Now gather all of the pieces you have put together so far.
Pin the ties and buttoned flap onto the bag like shown in the picture below.
Now take the 21" x 3" main colored piece of fabric and fold it so that the wrong sides are touching and right sides are facing out. Working with the folded edge on the bottom pin around the top of the bag. You are going to pin right over the ties and buttoned flap that you just pinned in place.
Sew. Searge or zig-zag stitch unfinished edge.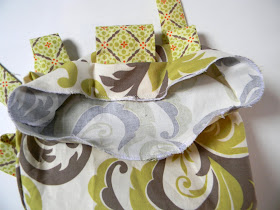
Fold piece inside of bag and iron flat. Top stitch all around the top of the bag. Make sure you don't sew the ties or flap down by mistake.
Now gather the 2 pieces of fabric that are 20" x 2". Sew the two pieces of fabric together to make one long piece of fabric. Now fold right sides together and sew along the open side. Turn right sides out and iron flat. Fold edges in or make them pointy.
Pull tie through opening in the top of the bag. Now you have your drawstring bag.
Add a button or some Velcro to the flap piece.
Don't forget to add your tag if you have one and add any embellishments.
Now fill with clothespins and your ready to do some laundry!

I love that my clothespins will no longer be falling out.

And that it ties perfectly around my laundry basket handle.
Or will secure perfectly onto my clothesline.


**Please feel free to use this tutorial for your personal sewing projects. You may link this to your blog and use any photo's. Just please be kind and give credit where credit is due.**
Any questions or comments please do not hesitate to contact me. If you make one using this tutorial, please add it to my flickr group. I would love to see it and you just might see it featured on my blog someday!

SOOO CUUUUTE! Love that fabric too!
ReplyDeleteSo cute! Where do you get your labels from? I love them :)
ReplyDeleteJust found your blog and I'm loving it! Shared it with all my facebook friends. Thanks for sharing your vision for making things. God bless.
ReplyDeleteJanine
cute idea! Thanks for sharing your tutorial. Love your fabric choices too!
ReplyDeletesuper cute!!! makes me wish I needed a clothes pin bag :) Thanks for sharing!
ReplyDeleteYour fabric choices are great. I have not seen a bag in that design, I may have to try it. I always love what you make:)
ReplyDelete