
Scrappy Bunny and Chick {tutorial}

 To make the bunny, I used one pink egg.
 Cut some fabric scraps about 1 1/2" wide. Its hard to say exactly how long, because it all depends on how you ruffle your egg. But a fat quarter is more then enough fabric to make one egg.
 Take and fold the fabric in half.
 Now start by twirling the end of it a little bit.
 Add some glue to the tip of the egg and press your twirled piece onto the egg. You will be gluing the folded edges onto the egg so that the raw edges are up.
 You will be working in small sections going around the egg. Add a little glue to the egg and then gather and bunch the folded edges so that they make a ruffle. Press the folded edges onto the glue area of the egg.
 Then push down on the ruffles so that you cover up as much of the egg as possible.

 Keep working till the whole egg is covered in ruffles. To finish off the end just glue in place.
 Gather buttons, ribbon and some sewing supplies. You are going to attach the button onto the ribbon. Of course you could glue them together instead.
 Lay the egg on its side. You are going to be attaching the bunnies face onto the bottom of the egg. Attach the nose and whiskers now by gluing in place.
 Cut out some ears to the desired length and width. Then sew them together, right sides facing up.
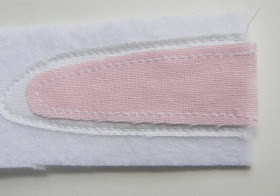 Then sew the ears onto some felt or thicker fabric to give them strength. Then trim the excess fabric off.
 Fold the ears inward and make a few stitches on the bottom of the ear to give them shape.
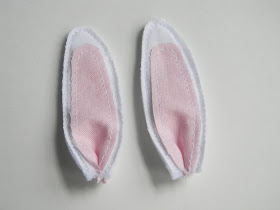 See, much cuter!
 Now attach the ears.
 To make the bunnies tail, take another piece of fabric that is about 1" wide by 18" or so. Fold piece together like you did above but this time you are going to ruffle it on itself and keep ruffling and gluing it onto itself.
 And then you have a little bunny tail.

 Now add some eyes to the bunny. I used some black brads but you can use whatever you have on hand. I also added another button to the nose, just because I thought it looked cuter.

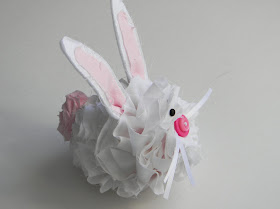 And there you have it, a cute little scrappy bunny and just in time for Easter.

 Now lets make this cute little chick.
 Gather one egg and some fabric, just like before.
 Ruffle all around the egg.
 Cut two pieces of contrasting fabric that are about 1" x 1" to make the beak. Place right sides together and sew all around leaving the straight side open.
 Then take one side of the beak and add some stitches in the middle to give the beak shape.
 Stuff the beak with some tiny fabric scraps, this will give the beak more shape.
 Cut one piece like above, this is going to be the cute little feathers on top. Again cut them to the desired length. I think mine were about 2" long.
 Now cut two piece for the wings. Fold one piece of fabric in half to make them the same shape when unfolded.
 Take your wings and gather them like above, gluing them into the desired shape.
 Now it is time to add them to the chick. This time the egg is going to stand up and the bottom of the egg is the bottom of the chick. Glue wings and beak on in desired places.
 Glue feathers on top of chick.
 Now cut some feet out. I cut mine like so, but ended up cutting them smaller once glued in place. Just see what you like more. There is no right or wrong way here.
 Cut one last piece for the tail feathers and glue in place on the back of the chick. I also cut a few extra pieces of the orange to add to the feathers on top of the chick's head. I just thought it needed some.
 Lastly, take two or four buttons and glue them on for the chicks eyes.
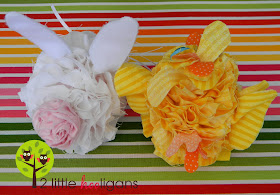
 Now you have a scrappy little chick.
 And a scrappy little bunny.
 Just in time for Easter!
 **Please feel free to use this tutorial for your personal sewing projects. You may link this to your blog and use any photo's. Please be kind and give credit where credit is due.**

(allow 20 minutes each)

Materials Needed:
*plastic eggs
*fabric scraps (cotton and felt)
*buttons, ribbon, brads or other notions
*glue gun
 To make the bunny, I used one pink egg.
  Cut some fabric scraps about 1 1/2" wide. Its hard to say exactly how long, because it all depends on how you ruffle your egg. But a fat quarter is more then enough fabric to make one egg.
  Take and fold the fabric in half.
  Now start by twirling the end of it a little bit.
  Add some glue to the tip of the egg and press your twirled piece onto the egg. You will be gluing the folded edges onto the egg so that the raw edges are up.
  You will be working in small sections going around the egg. Add a little glue to the egg and then gather and bunch the folded edges so that they make a ruffle. Press the folded edges onto the glue area of the egg.
  Then push down on the ruffles so that you cover up as much of the egg as possible.
It will look something like this.
 Keep working till the whole egg is covered in ruffles. To finish off the end just glue in place.
  Gather buttons, ribbon and some sewing supplies. You are going to attach the button onto the ribbon. Of course you could glue them together instead.
 Lay the egg on its side. You are going to be attaching the bunnies face onto the bottom of the egg. Attach the nose and whiskers now by gluing in place.
 Cut out some ears to the desired length and width. Then sew them together, right sides facing up.
 Then sew the ears onto some felt or thicker fabric to give them strength. Then trim the excess fabric off.
 Fold the ears inward and make a few stitches on the bottom of the ear to give them shape.
 See, much cuter!
 Now attach the ears.
 To make the bunnies tail, take another piece of fabric that is about 1" wide by 18" or so. Fold piece together like you did above but this time you are going to ruffle it on itself and keep ruffling and gluing it onto itself.
 And then you have a little bunny tail.
 Now add some eyes to the bunny. I used some black brads but you can use whatever you have on hand. I also added another button to the nose, just because I thought it looked cuter.
 And there you have it, a cute little scrappy bunny and just in time for Easter.
 Now lets make this cute little chick.
 Gather one egg and some fabric, just like before.
  Ruffle all around the egg.
 Cut two pieces of contrasting fabric that are about 1" x 1" to make the beak. Place right sides together and sew all around leaving the straight side open.
  Then take one side of the beak and add some stitches in the middle to give the beak shape.
 Stuff the beak with some tiny fabric scraps, this will give the beak more shape.
 Cut one piece like above, this is going to be the cute little feathers on top. Again cut them to the desired length. I think mine were about 2" long.
 Now cut two piece for the wings. Fold one piece of fabric in half to make them the same shape when unfolded.
 Take your wings and gather them like above, gluing them into the desired shape.
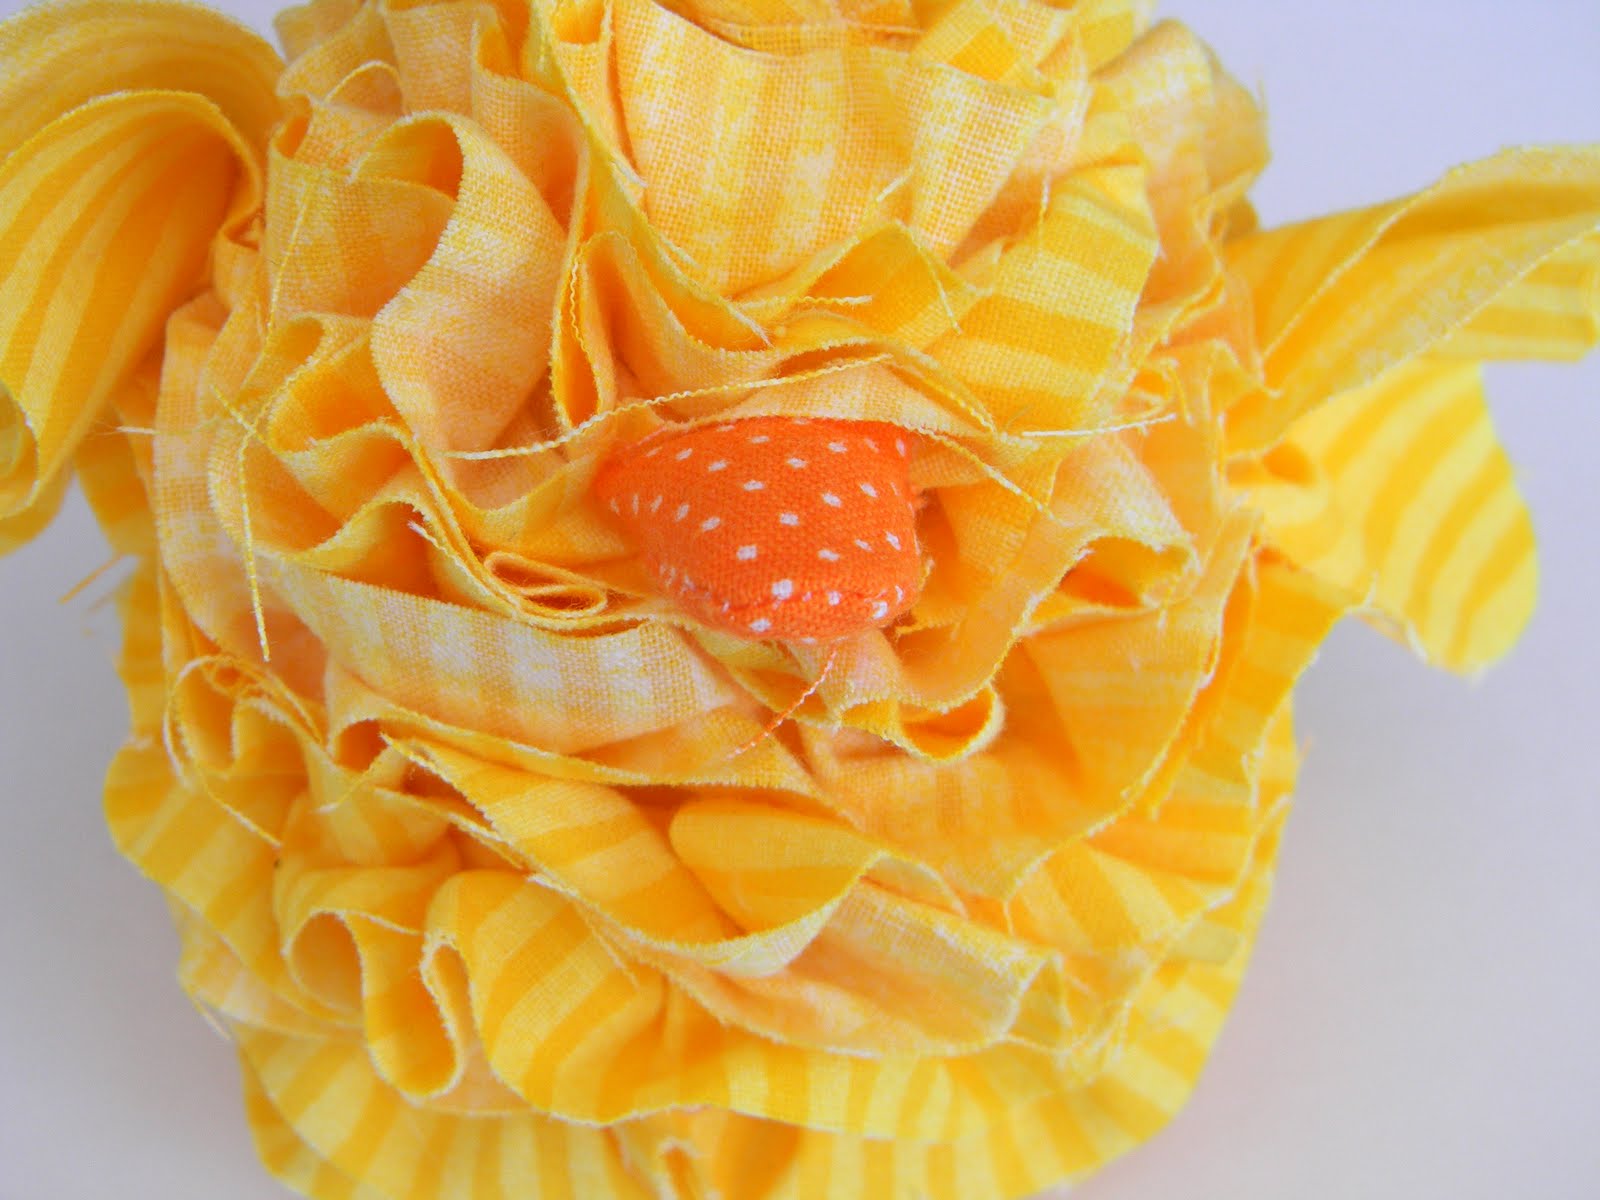 Now it is time to add them to the chick. This time the egg is going to stand up and the bottom of the egg is the bottom of the chick. Glue wings and beak on in desired places.
 Glue feathers on top of chick.
 Now cut some feet out. I cut mine like so, but ended up cutting them smaller once glued in place. Just see what you like more. There is no right or wrong way here.
 Cut one last piece for the tail feathers and glue in place on the back of the chick. I also cut a few extra pieces of the orange to add to the feathers on top of the chick's head. I just thought it needed some.
 Lastly, take two or four buttons and glue them on for the chicks eyes.
 Now you have a scrappy little chick.
 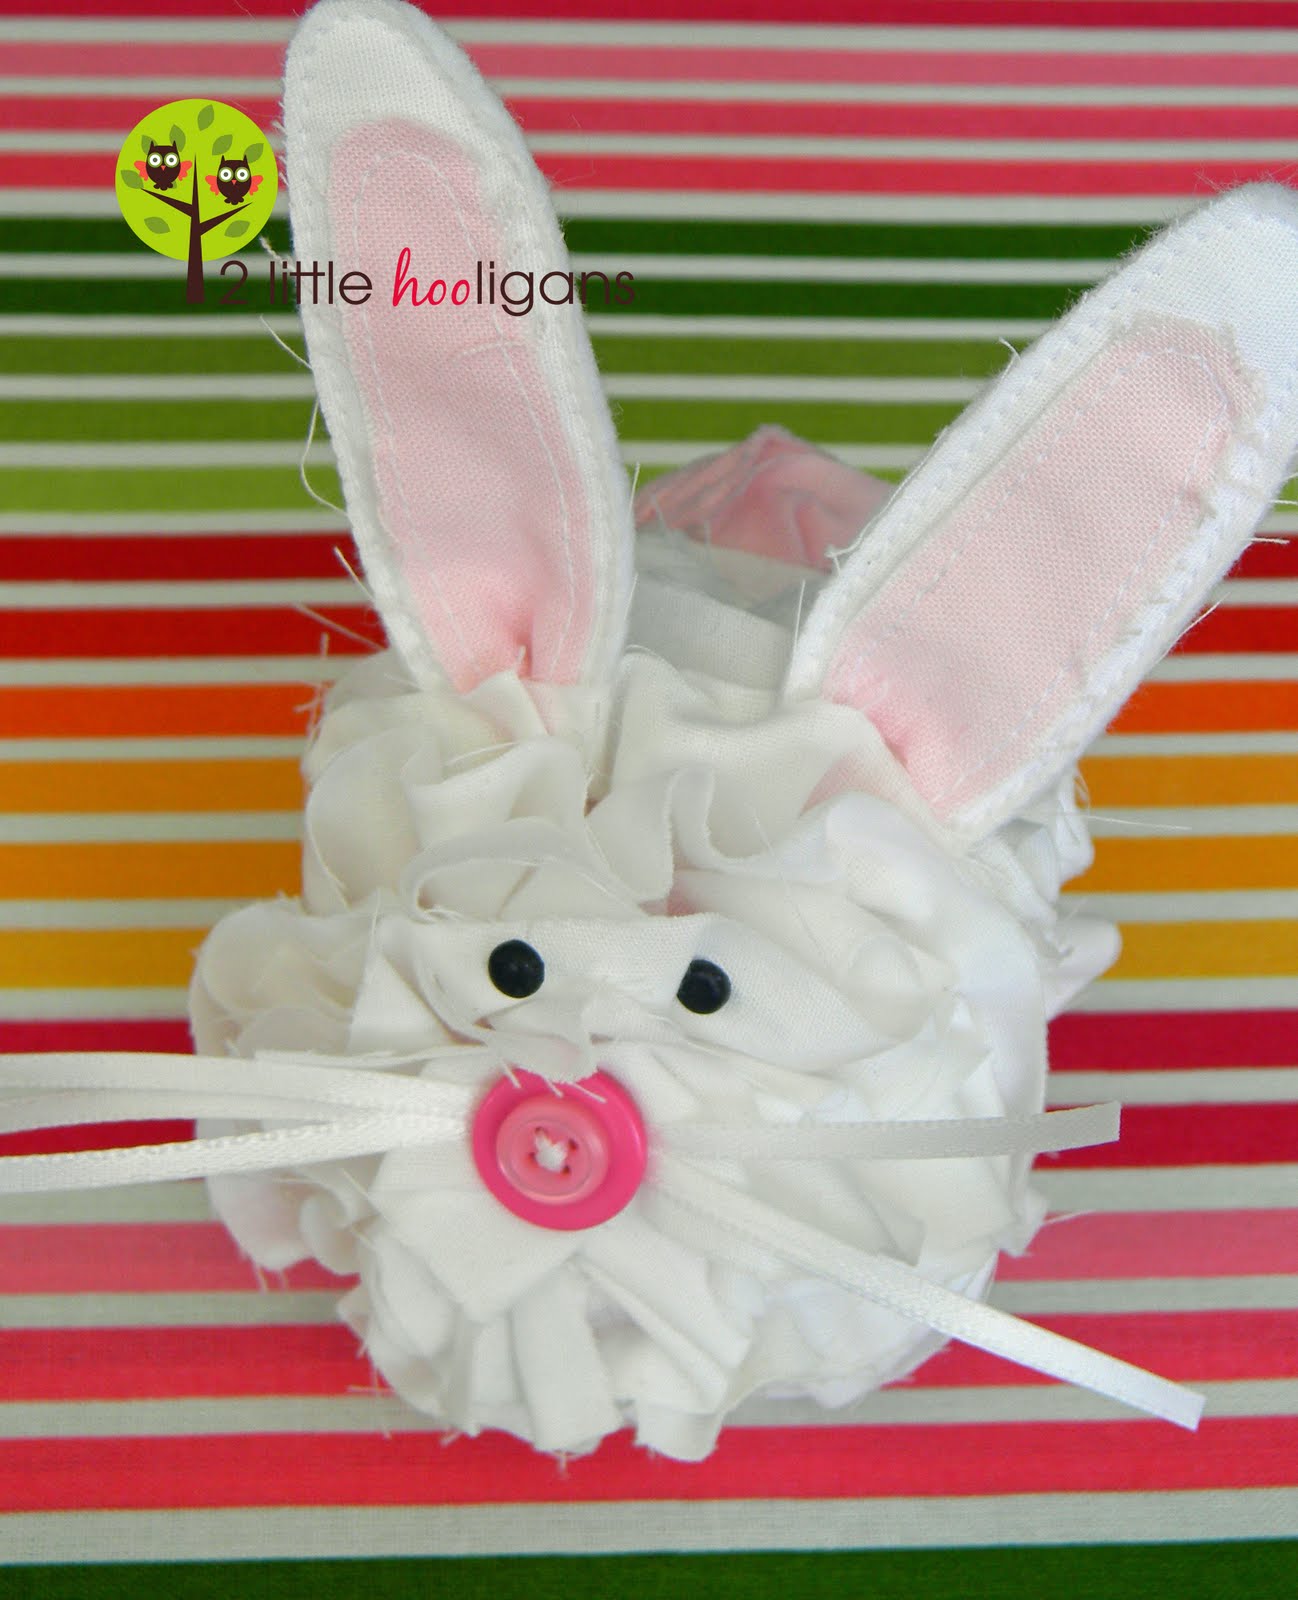 And a scrappy little bunny.
 Just in time for Easter!
  **Please feel free to use this tutorial for your personal sewing projects. You may link this to your blog and use any photo's. Please be kind and give credit where credit is due.**
 Any questions or comments please do not hesitate to contact me. If you make one using this tutorial, please add it to my flickr group. I would love to see it and you just might see it featured on my blog one day!
These are adorable! Great idea!
ReplyDeleteWaaaay cute, Christina!
ReplyDeleteawesome!!! I´ll feature on my blog. Hope you don´t mind
ReplyDeletehugs from Brazil
Oh! Oh migosh these are so stinkin ADORABLE! I'm going to feature this on my blog! I have not seen anything so cute in a while. I'm a new follower too! I would be delighted to have you link this up to my VIP party this weekend=)http://designergarden.blogspot.com/2011/04/vip-party-10.html
ReplyDeleteHow cute!
ReplyDeleteI have to say that is very clever! Love it!
ReplyDeleteThe texture on your bunny and chick is amazing. I have yet this see a craft with this much detail!
ReplyDeleteIf you have a moment today, please share this with my readers @Creative Juice Thursday Hope to see yours among all the amazing projects!
Oh my gosh, those are SOOO SWEET! What an adorable and clever idea!
ReplyDeleteThanks so much for sharing this at my For the Kids Friday Link Party! I appreciate you stopping by. I will be posting this week's link party shortly. I'd love to see what you have to share this week!
Hope to see you soon!
:)rachel @ http://SunScholars.blogspot.com
Those are the cutest things EVER!!! I'll have to save this idea for next year. Have a great weekend!
ReplyDeleteThanks for sharing this at Creative Juice! Hope to see you back at the party tonight!
ReplyDelete