
Welcome to fat quarter friday!
Ruffled Wristlet Tutorial
(Allow 1-2 hours to complete project)

Materials Needed:
* two fat quarters or one fat quarter and a scrap piece of fabric.
* 7" zipper
* 3/4" D ring
* clasp
* flannel, batting or stabilizer (I will be using flannel)
* 7" zipper
* 3/4" D ring
* clasp
* flannel, batting or stabilizer (I will be using flannel)

From one fat quarter (main fabric) cut the following:
*2 pieces at 6" x 4" (inside pocket)
*4 pieces at 8" x 6" (bag)
*1 piece at 15" x 2" (handle)
*4 pieces at 8" x 6" (bag)
*1 piece at 15" x 2" (handle)
From another fat quarter (contrasting fabric) or scrap piece cut the following:
*1 piece at 18" x 4" (ruffle)
*1 piece at 4" x 1 1/2" (tip of handle)
*1 piece at 18" x 4" (ruffle)
*1 piece at 4" x 1 1/2" (tip of handle)
Cut batting or flannel to the following sizes:
*1 piece at 6" x 4" (inside pocket)
*2 pieces at 8" x 6" (bag)
*1 piece at 6" x 4" (inside pocket)
*2 pieces at 8" x 6" (bag)
Now that all your pieces are cut out, let's get started!
 Get the 18" x 4" piece of fabric, we are going to make the ruffle with it.
 Fold wrong sides together and sew edge.
 Iron so that the sewn edge is in the center. Change the stitch length on your machine to a length of 4 and stitch the piece of fabric down the center. Gently pull one of the threads to gather and cause it to ruffle.
 Now that you have a ruffle, iron it slightly and place it on top of a 8" x 6" piece of fabric. Place the ruffle about 1 1/2" to 2" up from the bottom. Sew ruffle in place on the top edge and the bottom edge.
 Seam rip the thread that you used to make the ruffle. Set aside.
 Now we are going to make the pocket for the inside of the bag. Gather the two 6" x 4" pieces of fabric and the 6" x 4" piece of flannel.
 Layer the three pieces like so. The flannel piece on the bottom, next a fabric piece right side up, and a fabric piece wrong side up. Sew around all edges, while leaving a 2" opening for turning right side out.
 Trim edges and square off corners.
 Turn right side out, iron flat and top stitch just on the top edge of pocket.
 Take another 8" x 6" piece of fabric and place the pocket piece you just sewed, on top of it about 1 1/2" up from the bottom. Make sure the pocket is centered as well.
 Sew in place on all three sides.
Set aside.
Set aside.
 Take the 15" x 2" piece of fabric and sew right sides together.
  Trim excess fabric. Place a pin on one end and push inside to turn right side out. Iron and top stitch on the right and left side.
 Trim off a 2" piece, this will be used to attach the D ring onto the bag.
Set aside.
 Gather the 4" x 1 1/2" piece of fabric.
 With right sides together sew, leaving one edge open.
 Turn right side out and fold raw edge in about a 1" or so.
 Now place the handle piece through the clasp and sew in place as close to the clasp as possible. Now take the raw edges from the handle piece and tuck them into the little pocket that you just made.
  Sew pocket piece in place like so. It should look like this now.
  Take the 2" piece that you cut off from the handle piece and pull through the D ring.
  Sew the D ring in place like above. Make sure you sew as close to the edge as possible.
  Now let's put the bag together.
 Take the piece of fabric that has the pocket sewn on it and lay it right side up.
 Place the zipper on top, with the teeth on top. Make sure it is even with top edge.
 Then place a piece of fabric wrong side up on top of the zipper. Lastly, place a 8" x 6" piece of flannel on top.
 Make sure they are layered like in the picture above.
 Time to sew them together. If you have a zipper foot, go ahead and sew them together. If you don't have a zipper foot (that's me) just place the edge of foot against the edge of the zipper teeth. Move the position of the needle. You want it as close to the zipper as possible. See picture above. Sew until you get to the zipper, then stop.
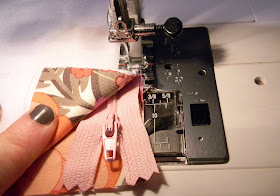 With the needle still in the fabric and the foot is down, unzip the zipper and move it out of the way. Line up edges again and finish stitching. Easy right?
 Looks like this now. Unfold so that fabric pieces are right sides facing out.
 Iron and top stitch the top edge. Stitch as close to the zipper as possible.
 Gather the last 8" x 6" piece of fabric. Lay right side up. Place the piece that you just attached the zipper to (zipper side up) on top.
 Then take the ruffle piece and lay wrong side up ontop of the zipper piece. Make sure they are layered like the picture above. Notice the D ring and where it is.
 Now place flannel piece on top. Make sure they are all lined up at the top. Pin and sew zipper on like you did before.
 Unfold, iron flat, and top stitch close to zipper like you did before.
 And this is going to be the inside of the bag.
 Lay pieces like so. The pieces that make up the inside of the bag should have their right sides facing and are on top of one another. (See them pictured on the left side above?) Now the pieces that make up the outside of the bag along with the flannel should be on top of one another with right sides facing. (See them on the right.)
 **Note: this part is important.**
 Place the zipper on top, with the teeth on top. Make sure it is even with top edge.
 Then place a piece of fabric wrong side up on top of the zipper. Lastly, place a 8" x 6" piece of flannel on top.
  Make sure they are layered like in the picture above.
  Time to sew them together. If you have a zipper foot, go ahead and sew them together. If you don't have a zipper foot (that's me) just place the edge of foot against the edge of the zipper teeth. Move the position of the needle. You want it as close to the zipper as possible. See picture above. Sew until you get to the zipper, then stop.
 With the needle still in the fabric and the foot is down, unzip the zipper and move it out of the way. Line up edges again and finish stitching. Easy right?
 Looks like this now. Unfold so that fabric pieces are right sides facing out.
 Iron and top stitch the top edge. Stitch as close to the zipper as possible.
 Gather the last 8" x 6" piece of fabric. Lay right side up. Place the piece that you just attached the zipper to (zipper side up) on top.
 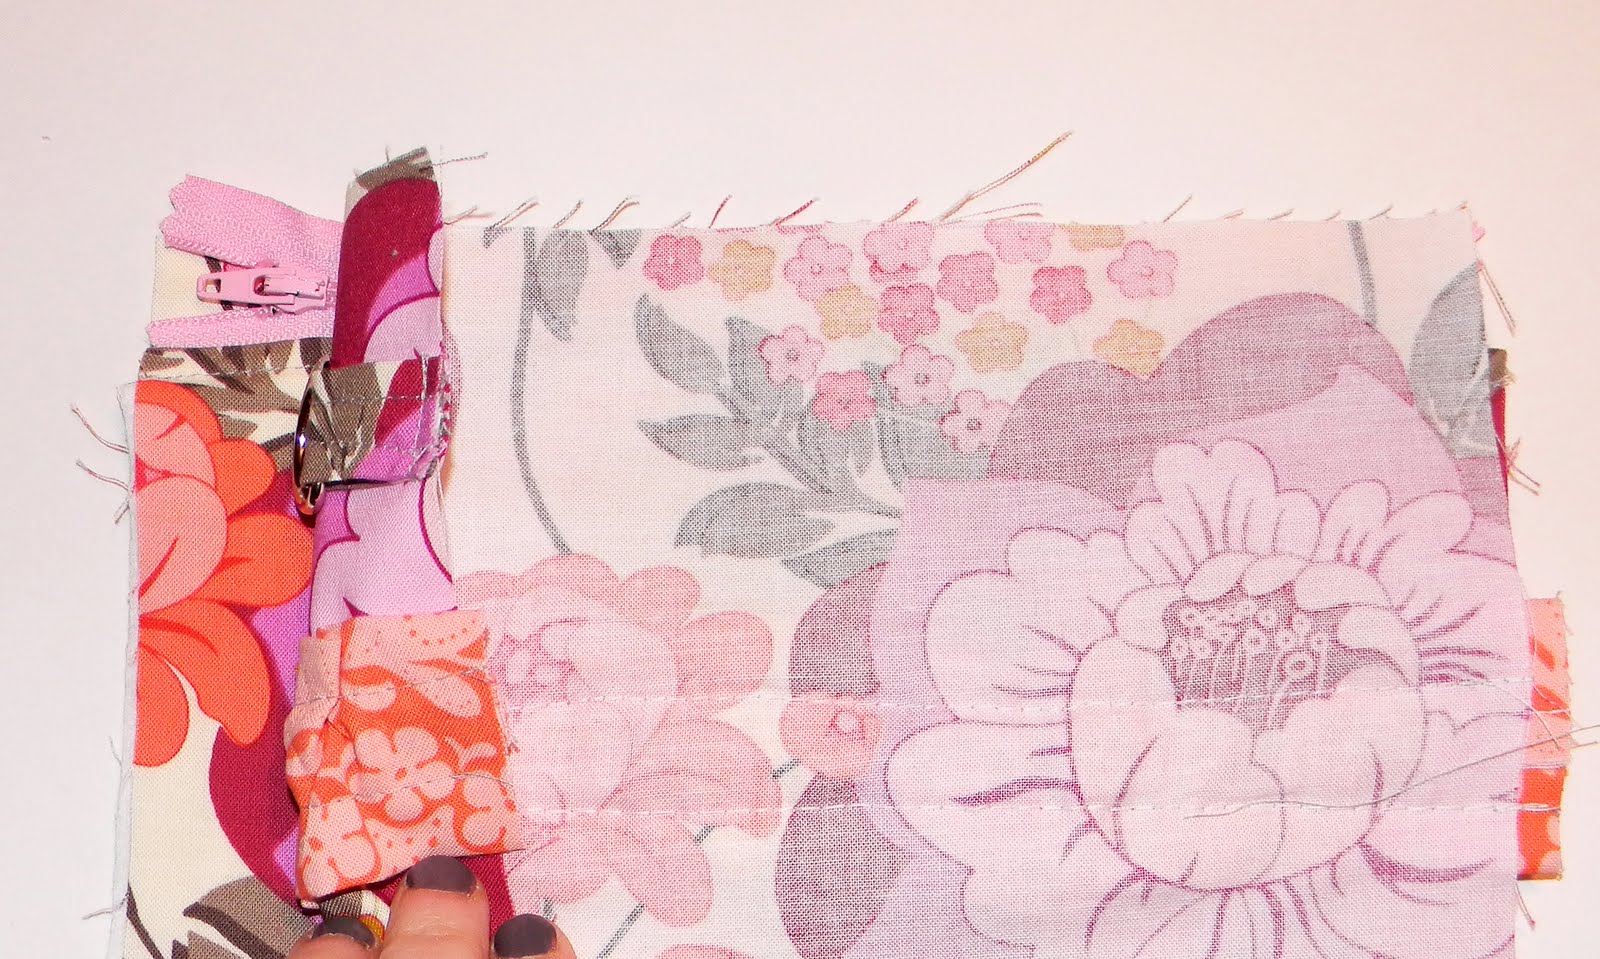 Then take the ruffle piece and lay wrong side up ontop of the zipper piece. Make sure they are layered like the picture above. Notice the D ring and where it is.
 Now place flannel piece on top. Make sure they are all lined up at the top. Pin and sew zipper on like you did before.
 Unfold, iron flat, and top stitch close to zipper like you did before.
 This will be the outside of bag.
 And this is going to be the inside of the bag.
 Take and trim up the edges with your rotary cutter. Make sure they are even and straight.
Now it is time to sew the bag together.
 Lay pieces like so. The pieces that make up the inside of the bag should have their right sides facing and are on top of one another. (See them pictured on the left side above?) Now the pieces that make up the outside of the bag along with the flannel should be on top of one another with right sides facing. (See them on the right.)
  **Note: this part is important.**
When sewing the sides together, make sure that the zipper is lined up and folded together like above. It is more important for the zipper to be lined up perfectly then for the fabric edges to be lined up.This is how you will make sure your zipper works correctly. Again, noticed how the fabric is lined up and the zipper is folded.
 Sew on all sides while leaving a 2 1/2" opening on the pieces that do not have the flannel, see them on the right? These are the pieces that make up the inside of the bag. The opening will allow you to pull the bag right side out. Don't pull right side out just yet.
 First you want to square off the edges, this will give the bag it's shape. Measure in about 1" from the tip of the triangle, draw a line and sew on top of line. Trim off excess fabric.
 Should look like this now. Pull right sides out through opening.
 Stitch opening shut as close to the edge as possible. Push fabric into the bag and give it it's shape.
 Here is the bag all finished. Now just attach the clasp to the D ring and your finished!

 And there you have it! Two fat quarters and some flannel and now you have a cute little ruffled wristlet!


**Please feel free to use this tutorial for your personal sewing projects. You may link this to your blog and use any photo's, just be kind and give credit where credit is due.**
Any questions or comments please do not hesitat to contact me. If you make one using this tutorial, please send me an email or add it to my flickr group. I would love to see it!
Ok, so lets have a giveaway! 
 Sew on all sides while leaving a 2 1/2" opening on the pieces that do not have the flannel, see them on the right? These are the pieces that make up the inside of the bag. The opening will allow you to pull the bag right side out. Don't pull right side out just yet.
 First you want to square off the edges, this will give the bag it's shape. Measure in about 1" from the tip of the triangle, draw a line and sew on top of line. Trim off excess fabric.
Repeat for all four sides.
 Should look like this now. Pull right sides out through opening.
 Stitch opening shut as close to the edge as possible. Push fabric into the bag and give it it's shape.
 Here is the bag all finished. Now just attach the clasp to the D ring and your finished!
  And there you have it! Two fat quarters and some flannel and now you have a cute little ruffled wristlet!


**Please feel free to use this tutorial for your personal sewing projects. You may link this to your blog and use any photo's, just be kind and give credit where credit is due.**
Any questions or comments please do not hesitat to contact me. If you make one using this tutorial, please send me an email or add it to my flickr group. I would love to see it!
Ok, so lets have a giveaway!
Anyone interested in winning this little ruffled wristlet?
To enter, just leave me a comment telling me what you would like to see here on fat quarter friday.
Giveaway ends January, 20th 2011
First, I love the idea of "fat quarter friday." I'm always a fan of purses and clutches that can be made with a fat quarter but I would love to see some ideas for gifts or softies that can be made last minute with a fat quarter. The wristlet looks great and I'm looking forward to next friday already.
ReplyDeleteI would like any kind of project that doesn't take more than one sitting to accomplish!
ReplyDeleteI love this wristlet and cannot wait to make it!
Your wristlet is darling! I'm keeping my fingers crossed. :)
ReplyDeleteI would love to see other quick projects for last minute gifts for kids. It seems I am always buying toys for birthday parties. A homemade gift would be nice.
thanks for the chance to win!
Love it!!! :)
ReplyDeleteHm I like the small stuffies idea:) maybe for a homemade mobile:)
Thx for the giveaway:):)
I recently made my first zippered clutch. It was very plain it certainly isn't as cute as yours, so I'm planning on making another one and include your pocket, ruffle, and wristlet ideas. Thanks for the tutorial! I'm very excited about "fat quarter friday"! Just the type of projects I love. Speaking of... I would like to possibly see some tote ideas. I like using them as gift bags that people can keep after opening their gift.
ReplyDeleteI love that you're doing this! I'm obsessed with buying fat quarters! The wristlet is so cute, love it! :D
ReplyDeleteI always like to make fabric headbands and baby toys with fat quarters, so that might be fun!
I LOVE your blog and have been following for a few months. However, I've never sewn anything in my life so I don't have a specific idea of what I'd like to see. (but I'd love to win anything you create!) I am reorganizing my craft space to include room for learning to sew so any project for a sewing newbie would be wonderful!
ReplyDeleteI'd love to see some baby tutorials (like baby shower gifts, bibs, wipes, etc.)
ReplyDeleteOhhhh, doll clothes. Didnt' expect me to say that did ya? Hahaha. I need to make some doll clothes.
ReplyDeleteI wanna win. Pick me :)
I featured this over at Today's Top 20!!
ReplyDeleteAmanda
www.todaystoptwenty.blogspot.com
I'll take anything. I have a big fabric problem I buy it because it's cute. {I just got 3 yards in the mail today!} And I like it so much that I just hold on to it. Don't cut. Just waiting for that perfect project. Oh gosh. I'm a hoarder!!!!!!
I too have become a lover of fat quarters. As someone who is just starting out they can be a great way to build up your stash. I would love to also see some small gift ideas and doll clothes. I have a niece that just loves dolls and I think my youngest is going in that direction too. I'm attempting to make a frilly satin number for my niece's new American girl doll wish me luck as I've never made doll clothes!
ReplyDeleteI have a weakness for fat quarters! They are so cute! I would like to see some ideas for home decor with fat quarters.
ReplyDeleteThat is so cute! I may have to try that!
ReplyDeleteI'm afraid I have never sewn with fat quarters (just getting into sewing) and have no idea what to do with them so I would love any (easy) project. This one is lovely!
ReplyDeleteI want to see this......tutorials that will allow me to use the small pieces in my fabric stash...with lots and lots of pictures.
ReplyDeleteWhat a cute and fun project! LOVE your Fat Quarter Fridays emblem or whatever you call it! Super cute!
ReplyDeleteI love this-so cute! I am new to the sewing world, so I'd love to see some simple things for those of us who are beginners :)
ReplyDeleteI love that you can make this with a fat quarter! I've got a few of those lying around that would make perfect little wristlets.
ReplyDeleteAmie @ http://www.kittycatsandairplanes.blogspot.com/
Anything baby girl and I'm all for it!!
ReplyDeletei'm just starting to learn how to quilt. i would love to see a patchwork pillow or lap quilt made from a few fat quarters.
ReplyDeletetaylor
SO sweet! And an amazing tutorial!
ReplyDeleteYou should come link this up to my weekly Thursday through Sunday Making It With Allie Link Party! I think it would make a Fabulous addition!
AllieMakes.Blogspot.com
Awe I think I'm too late for the giveaway! Still, love your step-by-step instructions, love the bag, love your blog and I would LOVE a unique quilted jacket idea for my little dog!
ReplyDeleteGreat set of instructions! Easy to follow but looks great!
ReplyDeleteI am a fat quarter-aholic, so I looove this! I'd like to see a small stuffy too, something fun for boys :)
ReplyDeleteWhat a cute project and I'm really loving ruffles at the moment so this is a perfect make :)
ReplyDeleteI too have loads of fat quarters , I'd love to see anything that makes a great gift , especially if it can be personalised with a name or initial x
cherrypinks @ hotmail .co .uk
Great tutoral. Love your ruffled clutch. I would like to see tote bags, bag accessories, anything for babies, ornaments, kitchen accessories, softies.
ReplyDeleteHi from France,
ReplyDeleteI just love your tute !! Great and seems very easy to follow with great explanations about how to place the zipper !! Thnaks! I will try it !! I would love to see easy and quick gift for kids or babies ...
Aurevoir
Stéphanie
Love it! THe fabric is fab and your nailpolish I also LOVE! OPI??
ReplyDeleteI love the tutorial and love that you are doing fat quarter friday, something quick, that i can have time for.
ReplyDeletecashischaos (dot) blogspot (dot) com
I love this -- and love the whole idea of fat quarter Friday. I'm a VERY beginner sew-er but a huge sucker for fat quarters. :) More tutorials -- you do great ones!
ReplyDeleteYES!!! I love the colors and I love WRISTLETS!!! only carry those for my "purse"
ReplyDeleteI love that you are doing a Fat Quarter Friday! I can't wait to see what else you come up with. I can never resist a cute Fat Quarter when I see one!
ReplyDeleteMerci beaucoup pour ces explications
ReplyDeletelove it! what about a pillow of some sort
ReplyDeleteI love this idea! I'm addicted to fat quarters and I've been making super cute peasant tops using three different fat quarters per top but a girl has got to branch out! Thanks so much.
ReplyDeleteHere's just one of the many I've posted on my blog:
http://divaskychick.wordpress.com/2010/12/10/christmas-peasant-tops-and-a-mad-mix-of-tutorials/
I have a limited relationship with my sewing machine so I would like to see any tutorial that does not use a zipper and can be done with just minimal corner turning. Thing real beginner! Nice wristlet. Thanks for the opprotunity to win.
ReplyDeletevia email: submiting for Sunni
ReplyDeleteI don't collect fat quarters! they steal through my window at night and wedge themselves in my sewing drawers!
I love to use my scraps and bits for dolls and softies for my girls. But, we can't forget the boys. How about a cute idea for a boy?
Can't wait to see what you come up with!!
I'm a new sewer so maybe some projects for beginners would be good. But, I'd also love to learn how to make a wallet. :)
ReplyDeleteCute wristlet! I'd love to make one for when I go to the beach and don't want to bring my purse. Thanks so much!
I love the idea of a fat quarter Friday tutorial! What I'd like to see is... anything original (more original than an apron or a placemat at least!)
ReplyDeleteGood luck and thanks for the tutorial & the giveaway!
linedupuy(at)hotmail(dot)fr
This is a great tutorial! I would like to see quick gift ideas using fat quarters...maybe for baby showers or even a bridal shower.
ReplyDeleteMore sewing relatedm tutorials please.
ReplyDeleteI love this! I will definitely be making these for my bridesmaids! I love amy kind of bag and I'd love to see something for the kitchen that's not an apron. Or things for artists!
ReplyDeleteI am so happy I found your site! I cant wait to see your Friday tutorial! I would love to see home decor projects!
ReplyDeleteI would love to see sewing tutorials for home decor. I love your blog and can not wait to see Friday's tutorial!
ReplyDeleteI REALLY want to venture into sewing and love your tutorials. Would love to see simple projects for beginners. Thanks for the giveaway.
ReplyDeletemattles22 at yahoo dot com
What a cute wristlet! I want it :)
ReplyDeleteI love your fat quarter friday idea! And would love to see something for Valentine's Day! I love celebrating holidays and decorating for seasons.
kirsti.clark@gmail.com
very very cute! i love fat quarters especially since they are so cheap to buy! I would like to see them transformed into something you can wear or add to clothing:)
ReplyDeletepinkcalaveras.blogspot.com
I love the wristlet and I love the idea of this new feature! I'm always collecting fat quarters and I never know what to do with them! I would love to see some fun rosettes to accessorize with. I've seen lots of people making them but I need a good tutorial :) And P.S. I'm a new follower! I've been to your blog several times so I figured I'd probably better start following ;)
ReplyDeleteSo cute! I love your ideas and you fabric choices! These little wristlets are just the thing to help me brave the land of zippers. Thanks for the tutorial! You know what I'd love? Your thoughts on a zipper pull. Is it too tiny to sew?
ReplyDeleteI really like getting more ideas for using fat quarters! I have grown my stash lately, and it's nice to have little projects to use them up! I would love to see things that can be made for new moms and their babies. I've made two of these wristlets already to put with new baby gifts! Thanks for the detailed tutorial!
ReplyDeleteI love to sew for my home, so anything home related is fun. Im loving this fat quarter friday!
ReplyDeleteVisiting from tipnut and now am your newest follower. Thanks for this tutorial. I love it!
ReplyDeleteWell I feel silly!!! You DID do a tutorial!!! It wasn't on your tutorial page....
ReplyDeleteI've already started on mine and our dimensions are a little different and I'm trying to add the cell phone pocket too. Can't wait to show you what I come up with :)
Thank you!!!
Lovely tutorial! If you'd like to see the one I made please see my blog below :)
ReplyDeletehttp://thehandmadehomemaker.blogspot.com/2011/04/pleated-carry-all-my-almost-first.html
I'm open to seeing anything using Fat Quarters! I just learned to sew and am just starting to use FQ to make some items so keep the ideas coming! :)
ReplyDelete